Table of contents
Getting started
SAS, via SAS Enterprise Guide, is the University’s preferred data querying and data manipulation tool, providing a point-and-click interface for query building. This guide will cover how to prepare complex datasets using SAS Enterprise Guide for further visualization using Power BI.
NOTE: Users must be provisioned to use SAS Enterprise Guide and are expected to complete an online training course. For more information about SAS Enterprise Guide and to request access to the tool, see the SAS Enterprise Guide Service page. This guide will assume that users have successfully completed the training course.
For Mac users
Mac users will access SAS Enterprise Guide via the Reporting Tools Desktop, a virtualized Windows desktop environment. Further details are provided in the SAS Enterprise Guide training course.
For Windows users
Windows users may download and install SAS Enterprise Guide locally on their machines. Further details are provided in the SAS Enterprise Guide training course.
Preparing data in SAS Enterprise guide
- In SAS Enterprise Guide, follow the typical steps for connecting to a data source and preparing the desired datasets.
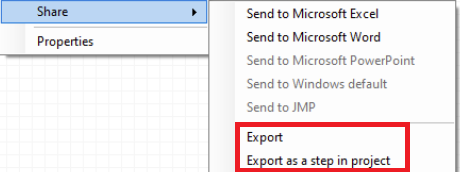
- When your final datasets are ready, right click on the desired output table within the process flow, hover over the Share item, and select Export.
Alternatively, you may choose to select the Export as a step in project option if you wish to automatically export the final data set each time the Process Flow is run.
- Follow the export wizard prompts, based on your selection. Select an appropriate name and location for the output file.
NOTE: Power BI does not natively support importing SAS dataset files (.sas7bdat). Additionally, the Export task will not permit exporting such dataset files to most machines. As such, the default export file type must be changed from the default SAS Data File type.
The recommended file type for importing to Power BI is a Microsoft Excel Workbook; however, CSV and other text file types may also be used.
For users who wish to utilize SAS dataset files directly, additional configuration must be done. See the end of this guide for further details. - Follow the appropriate instructions for importing data to Power BI based on the format you selected for your file export:
Connecting to Data in Power BI: Excel
Connecting to Data in Power BI: Flat Files [link to article]
Additional materials
Preparing your machine to use SAS dataset files directly
Power BI does not currently have a data connector for reading SAS dataset, SPSS, or other statistical file types (e.g., .sas7bdat, .sav, .spv). To import such files into Power BI Desktop, another utility will be required.
R, with the correct packages, can be used to read in SAS dataset files into Power BI Desktop.
- Download and install R on your machine.
- Enable R in Power BI Desktop. Open Power BI Desktop and open File, select Options and Settings, select Options, and then R Scripting. Confirm that the R home directory is set to the path of your R installation.
- Install the .sas7bdat library by running the command: install.packages("sas7bdat").
- Prepare your data in SAS Enterprise Guide, as usual. When your final dataset's are ready, right click on the table in the Process Flow. Select Browse tasks and search for the Download Data Files to PC task. Click Add… and browse for each desired data set. Choose an appropriate folder location for the file(s), and click Finish to run the download.
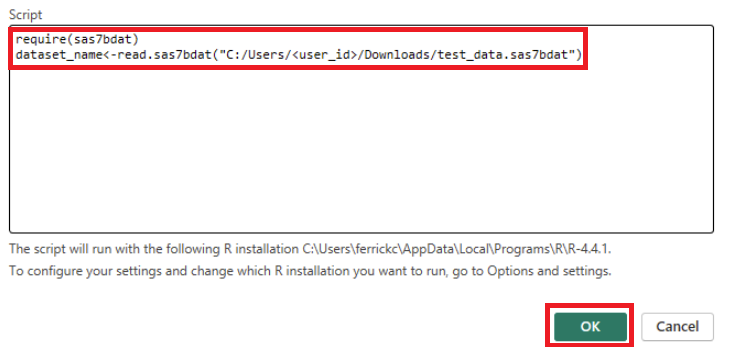
- Read in the file. In Power BI, open Get Data and select R Script. Enter the script below, updating the values below, as appropriate.
require(sas7bdat)
dataset_name<-read.sas7bdat("C:/Users/<user_id>/Downloads/test_data.sas7bdat").
The “dataset_name” value may be replaced with the name you wish for the dataset within Power BI. Update the complete file path to point to your data file. Multiple files may be imported in a single script by adding additional read lines, one per file.
NOTE: Windows machines will use backslashes (\) in file paths. These will need to be replaced with forward slashes (/). - Click OK to run the script.

- In the Navigator window, click on the dataset name to preview the data in the panel on the right. Check the box next to the dataset name and click Load to import the dataset to the Power BI semantic model.
