Table of contents
Cisco Web Assistant allows you to manage your voicemail from the web in Web Inbox, as well as customize messaging settings using Messaging Assistant. Personal Call Transfer Rules is not covered in this article.
Access Cisco web assistant
Go to Cisco Web Assistant and log in with your Directory ID and password.
NOTE: If you are off campus, you will first need to connect to the Virtual Private Network (VPN).
Web inbox
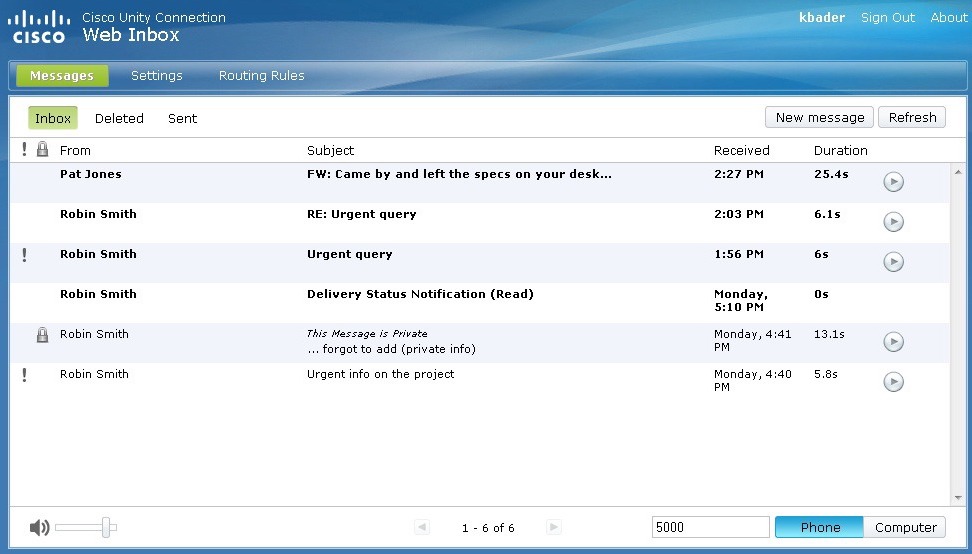
The Cisco Web Inbox allows your to manage voice messages. From this location, you can compose new messages, listen to, reply to, forward, or delete voice messages that you receive. Navigating the Web Inbox is easy. Find your voice messages in the center, audio controls at the bottom, and navigation menus at the top of your screen.
Listen to messages
Click the play button to play a message from your browser.
Reply to messages
It is not possible to send replies to phone numbers outside of the UMD Cisco phone network. However, it is possible to record and send messages to email addresses inside or outside of the UMD community by using Compose new messages instructions below.
- If you plan to record your voice message by phone, select Phone and enter a UMD Cisco phone number, such as your desk phone. If you plan to record your voice message by computer, select Computer.
Web Inbox does not support recording voice messages by phones that are not part of the UMD Cisco phone network (such as a personal mobile device).
NOTE: Recording with a computer requires Flash version 10.0.0 or later and a microphone. - Click the message to which you will reply.
- Click Reply.
- Record a voice message or upload an audio file (only .wav files accepted). Click Send.
The original message is not included in the reply.
Compose new messages
- If you plan to record your voice message by phone, select Phone and enter a UMD Cisco phone number, such as your desk phone. If you plan to record your voice message by computer, select Computer.
Web Inbox does not support recording voice messages by phones that are not part of the UMD Cisco phone network (such as a personal mobile device).
NOTE: Recording with a computer requires Flash version 10.0.0 or later and a microphone. - Click New Message.
- In the recipients field, enter your intended recipients. Names will be suggested from the UMD directory as you type. Separate multiple recipients with a semi-colon (;).
NOTE: You cannot send messages to phone numbers. - Click Send.
Forward messages
- Select the message you want to forward.
- Click Forward.
- Enter your recipient(s)'s email address(es). Click Send.
You can record a message to send in addition to the message being forwarded.
- If you plan to record your voice message by phone, select Phone and enter a phone number. The number will be called and you will be prompted by a beep to record your message.
- If you plan to record your voice message by computer, select Computer. Recording with a computer requires Flash version 10.0.0 or later and a microphone.
Messaging assistant
Cisco's Messaging Assistant allows you to personalize how you and your callers interact with your phone. You can change your recorded greetings, and send voice message notifications to your email.
Change your recorded greeting
- Go to Cisco Web Assistant and log in with your directory ID and password. If you are off campus, you will first need to connect to the Virtual Private Network (VPN).
- Click Messaging Assistant.
- In the navigation menu, from the Greetings menu, click View Greetings.
- Click the Greeting you would like to update (ex. Internal, Busy, Holiday).
- To update your greeting with a personal recording, select My Personal Recording under Callers Hear.
- Enter a phone number or URI in Number or URI, then click Save. The number will be called and you will be prompted by a beep to record your message.
- Click Save.
Enable a greeting
You can create up to six different greetings. You can enable as many greetings as you want, and specify how long you want a greeting enabled. Learn more about available personal greetings and their uses by reading, Cisco IP Phones Personal Greetings.
- From Cisco's Messaging Assistant, click View Greetings from the Greetings menu.
- Check the box to enable the greeting and click Save.
- Specify how long you want the greeting enabled by clicking on the greeting and changing the Status. Click Save.
- If your greeting is set to Enabled with no end date and time, it will be set indefinitely.
Send voice message notifications to your email
- From Cisco's Messaging Assistant, click View Notification Devices from the Notification Devices.
- Click HTML 1, then click Notification Enabled.
- In the To: field, enter the email address where you'd like to receive email notifications.
- Under Notify Me Of, click All Voice Messages. Click Save.
