Table of Contents
Overview
Virtual Workspace provides University of Maryland students, staff and faculty with a Windows virtual desktop that includes a suite of software applications available for university work. The service allows you to access programs that may not be available on your desktop or laptop computer. The UMD Virtual Workspace runs in an Azure Virtual Desktop environment. From the Virtual Workspace, you can open and save files from cloud-based storage such as Box and Google. You can also manage and edit files on your local computer. See the video below for more information.
Storage Options and Retention
User Profiles
Each user is provided with 15GB of profile storage space for saving personal files and settings. Basic configuration settings that are stored in a user's profile will persist between uses. Using this space for saving personal files is not recommended. The user profile should be considered temporary storage. Examples of locations that are automatically saved to the user profile are your Documents, Downloads, and Photos folders.
If you do not log into the Virtual Workspace service at least once every 150 days, this temporary storage will be automatically deleted. At that time, any files and settings that are still saved to these temporary locations will be lost. It will not be possible to recover these files after the 150 day retention period.
Cloud Storage
If you need to permanently save important files or want to make your files available from other locations, DIT strongly encourages the use of Kumo. The Kumo service is provided on DIT-supported Virtual Workspace desktops such as the UMD Desktop.
Users can configure Kumo to automatically connect department-provided storage, Google Drive, Box, and other cloud storage services. Visit the Kumo setup page to learn more about which cloud storage options are currently available and how to configure them.
Session Limits
Virtual Workspace is a service provided broadly to the campus community and the resources are evenly shared between users. To ensure a consistent experience, idle sessions will automatically disconnect after 15 minutes of inactivity. (Inactivity means that no mouse or keyboard input has been detected in the session for a period of 15 minutes.)
Disconnecting the session does not immediately log off the account on the remote system, close any running applications, or stop any running processes that may be open. If you have been disconnected, you may reconnect to Virtual Workspace at any time within 1 hour after being disconnected to resume your session and pick up where you left off. If you do not reconnect to your session within 1 hour, you will be logged off, all running processes stopped, open applications closed, and unsaved file changes may be lost.
Access Restrictions
The virtual workspace contains remote applications and desktops for several groups. Each desktop or remote application resource may have different restrictions. If you think that you should have access to a resource that isn't being displayed in the Virtual Workspace, please contact your local IT team for assistance.
- The UMD Desktop is restricted to current employees and enrolled students. Students who have not yet registered for an upcoming semester may lose access to the Virtual Workspace resources. Please complete registration through your academic program to regain access to the resources.
- Certain Active Directory and IT management tools are available to IT administrators. Please complete the OU Administrator Access Form to see and use these resources.
- Lenel access is granted by UMPD. Please contact bss@umpd.umd.edu for information and access to these resources.
Data Classification
IT Compliance has performed a security evaluation on the UMD Virtual Workspace environment. Based on the results of the security evaluation, it was determined that the UMD Virtual Workspace has the appropriate security controls in place to safely and securely store and process UMD data with a risk level up to High (Level 3) as defined by the IT-2 University of Maryland's Data Classification Standard.
Please keep in mind that you may use the UMD Virtual Workspace to connect to services that are approved at a different/lower classification. You should only process and store data appropriate to the service you are working with. For a list of third-party vendors that have been reviewed by IT Compliance, see Software Approved by DIT Security.
Available Software
See our article Software Available in the UMD Virtual Workspace for detailed information.
Getting started
Choosing the right client to connect
| Windows | Web | Android | macOS | iOS | |
|---|---|---|---|---|---|
| Desktop experience |  |
 |
 |
 |
 |
| RemoteApp experience | Integrated | Immersive | Immersive | Integrated | Immersive |
| Multi-factor authentication |  |
 |
 |
 |
 |
| Conditional access |  |
 |
 |
 |
 |
| Localized | 17 languages | 17 languages | English | 17 languages | 17 languages |
| Third-party plugin support |  |
||||
| Dynamic resolution |  |
 |
 |
||
| Multimonitor |  |
 |
|||
| Subset of monitors |  |
Connecting with Windows
Configure the client
- Install the Remote Desktop Windows client: 64-bit and 32-bit.
Note: It is not recommended to use the version from the Microsoft Store as it does not have full functionality. - Open the Microsoft Remote Desktop application.
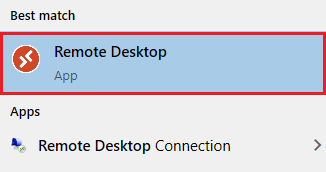
- Click Subscribe.
- Log in to Microsoft using your DirectoryID@umd.edu and passphrase.
- If prompted to select between two accounts, select the Work or School account.
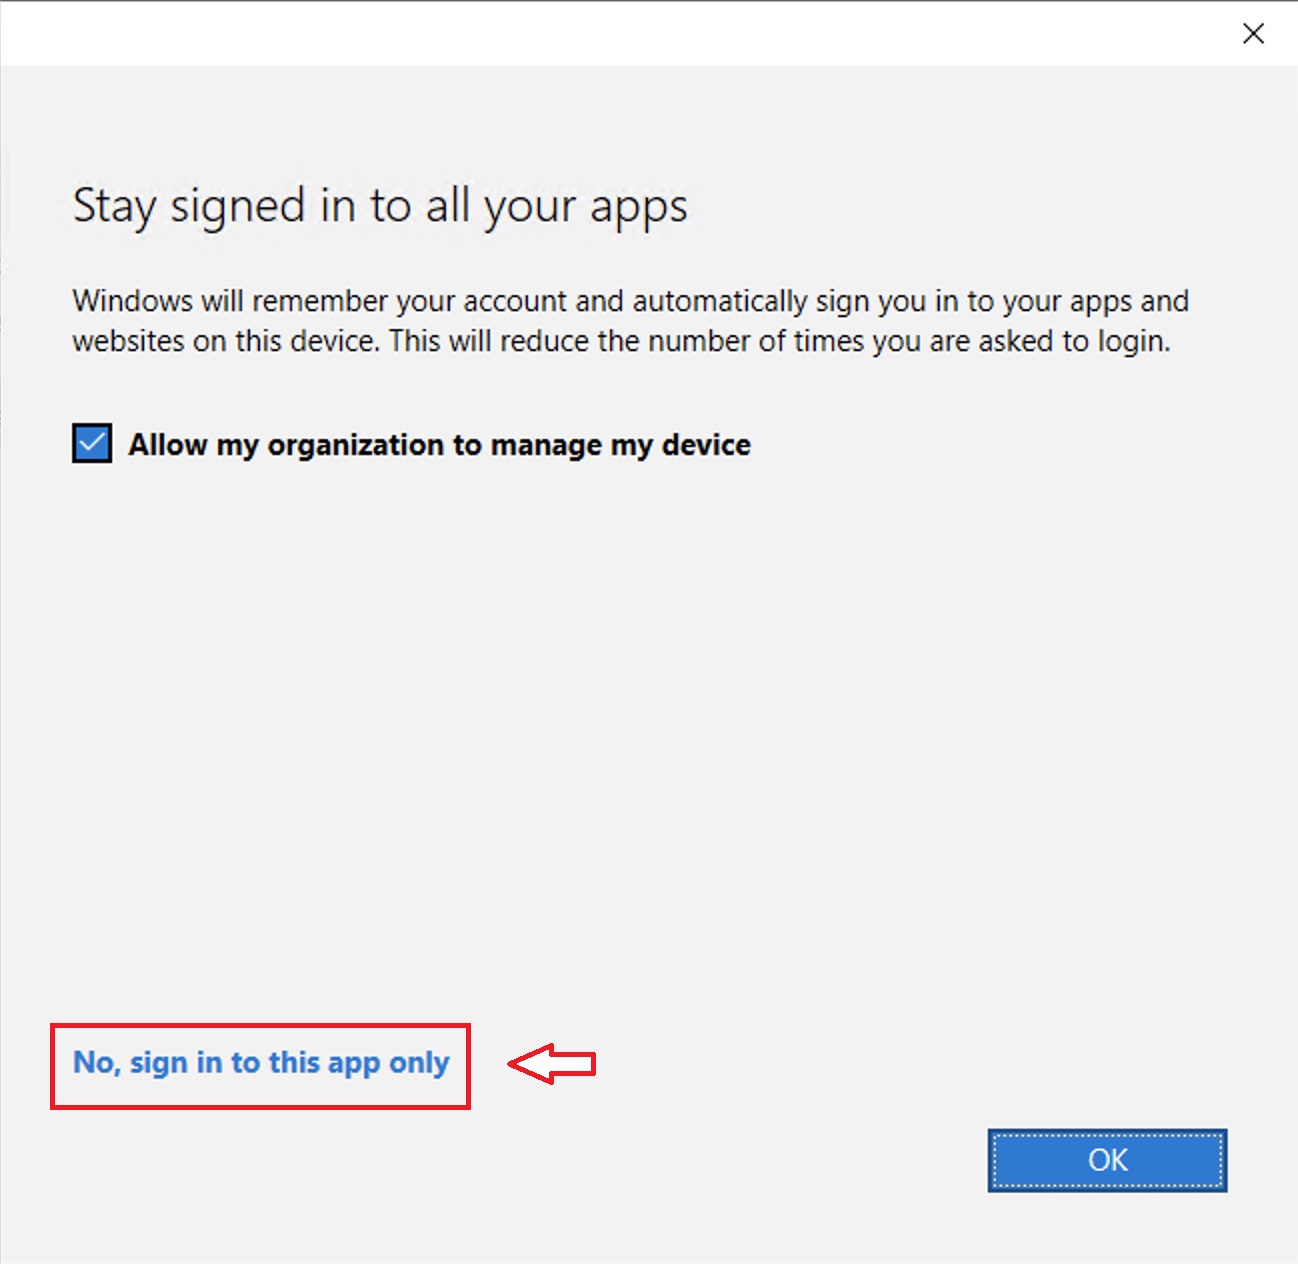
- If prompted about using this account for other apps, select No, sign in to this app only.
- You will see a list of your available apps and desktops. Double-click one to launch it.
- You will be prompted to log in again.
- If the username presented is not in the format DirectoryID@umd.edu, you may need to click More choices then select Use a different account.
- Enter your DirectoryID@umd.edu and passphrase.
- If the username presented is not in the format DirectoryID@umd.edu, you may need to click More choices then select Use a different account.
Your desktop or app will launch. For more information, read Connect with the Windows Desktop client.
Adjusting full screen, monitor spanning or resolution
- Right-click the desktop you want to change and select Settings.
- Set Use default settings to off. Then, configure the settings to your preferences.
Enable Remote Desktop on your PC
You can use Remote Desktop to connect to a PC on campus by Enabling Remote Desktop on Your PC but make sure you will first connect to VPN.
Connecting with MacOS
Configure the client
- Install the macOS remote desktop client: Universal.
- Open Microsoft Remote Desktop.
- Click Workspaces to toggle your available workspaces.
- Click Add Workspace.
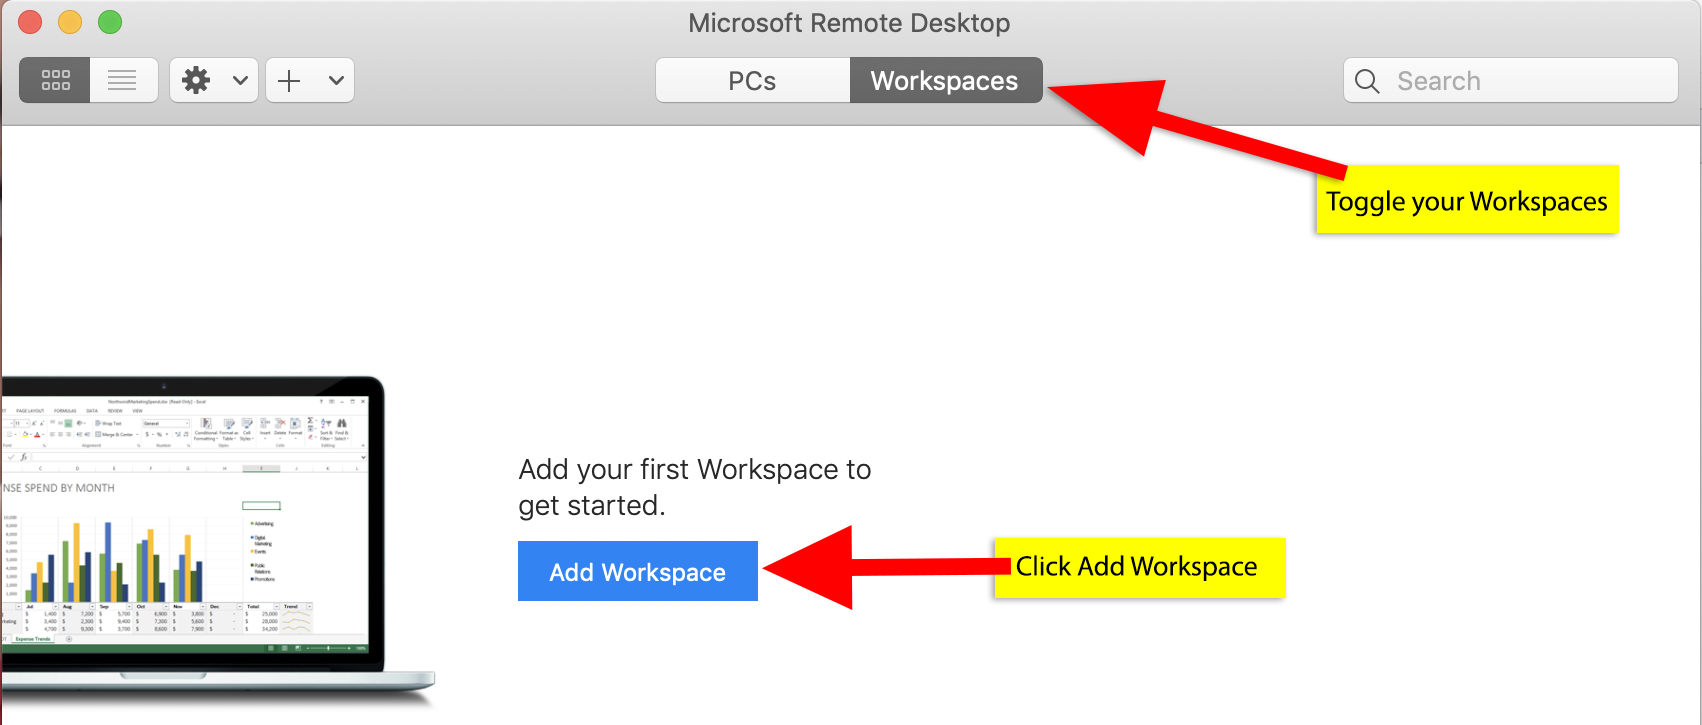
- In the Add Workspace field, enter your DirectoryID@umd.edu. Then, click Add.
- Log in to Microsoft using your DirectoryID@umd.edu. If prompted to select between two accounts, select the Work or School account.
- You will see a list of your available apps and desktops. Double-click one to launch it.
- You will be prompted again to log in. Log in and click Continue.
Your desktop or app will launch. For more information, read Connect with the macOS client.
Adjusting full screen, monitor spanning or resolution
- Right-click the desktop you want to change and select Edit.
- Select the Use custom settings box under the desktop name.
- Use the options on this screen to adjust the display so that it behaves as desired.
- Click Save when you're done.
Enabling folder redirection
- Start with the directions above for adjusting full screen, monitor spanning or resolution.
- Select the Folders tab and then check the Redirect folders box.
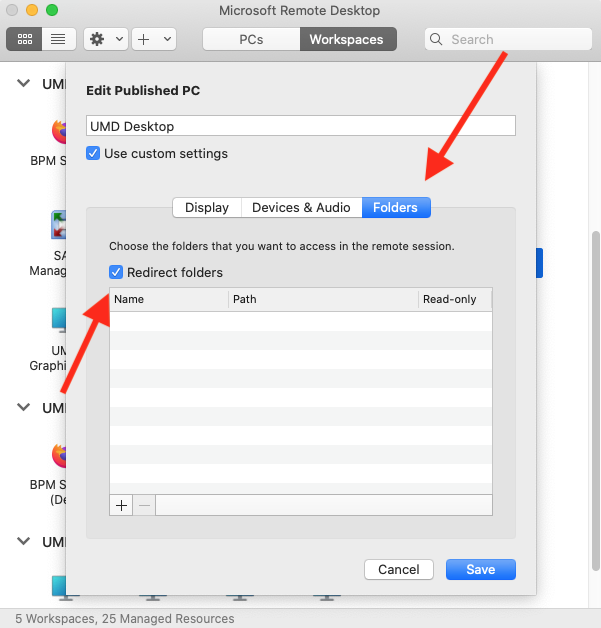
- Click the + button to add a local folder from your macOS device to the list of available folders. Repeat this for all folders that you want to have redirected to the remote desktop.
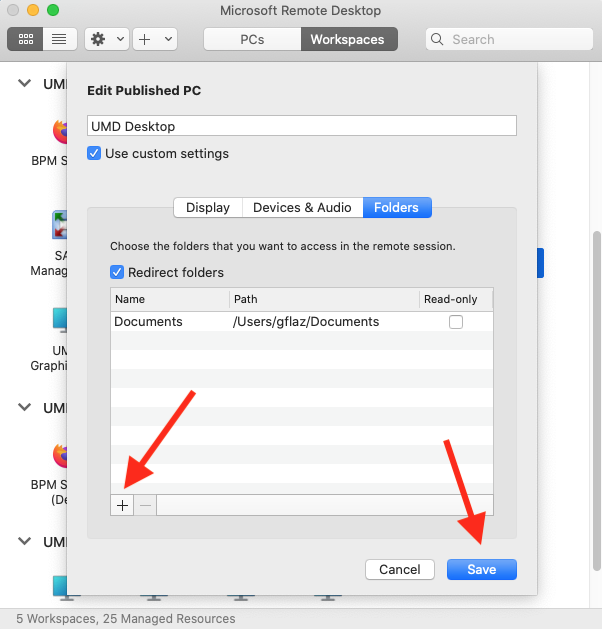
- Select Save when you're done.
Connecting with web browser
It is recommended to use one of the available desktop or mobile client to connect rather than the web portal. The web portal allows you quick access with limited features.
- Navigate to the Web Portal.
- Log in to Microsoft with your DirectoryID@umd.edu and passphrase
- You will see a list of your available apps and desktops. Double-click one to launch it.
- Give permission to allow the remote computer to access your local resources.
- You will be prompted again to log in. Log in with your DirectoryID@umd.edu and passphrase. Click Continue.
Your desktop or app will launch. For more information, read the Microsoft documentation.
Connecting with Android
- Install the Remote Desktop Android client from the Google Play Store.
- Open the RD client.
- Click the + button in the top right corner to expand the drop-down menu. Then, click Remote Resource Feed.
- Enter your directoryID@umd.edu. Then, click Next.
- Click Next to advance through the Add remote resource feed screen.
- Log in to Microsoft using your DirectoryID@umd.edu. Then, click Next. You may be prompted to verify your identity.
- You will see a list of available desktops. Click the Apps tab to see available apps. Click one to launch it.
- Click Connect to trust the remote PC and allow access to your local storage.
- You will be prompted to log in again. Log in with your Directory passphrase.
Your desktop or app will launch. For more information, read Connect with the Android client.
Connecting with ChromeOS
You can use the Remote Desktop client for Android to work with Windows apps and desktops directly from your Chromebook that supports the Google Play Store. The Android client supports Chromebooks with ChromeOS 53 and later.
Users connecting from Chromebooks running older operating systems or which do not support Android applications should connect with the web portal.
Connecting with iOS
- Install the remote desktop iOS client from the iOS App Store or iTunes.
- Open the Remote Desktop app.
- Click Continue to grant permissions in iOS for access to devices.
- Click the plus button in the upper right corner to expand the drop-down menu. Then, click Add Workspace.
- Enter your DirectoryID@umd.edu. Then, click Next.
- Log in to Microsoft using your DirectoryID@umd.edu. You may need to verify your identity.
- You will see a list of your available desktops. Click the Apps tab to see your available apps. Click one to launch it.
- You will be prompted to log in again. Log in with your DirectoryID@umd.edu and passphrase. Then, click Continue.
Your desktop or app will launch. For more information, read Connect with the iOS client.
Troubleshooting
See the Troubleshooting the UMD Virtual Workspace article for specific troubleshooting information.
